如何使用 Git + Hugo 搭建属于自己的博客网站
平时在开发过程中多多少少会有一些积累,这个时候就想把这些积累写成博客,一是当做自己本身的沉淀,二是可以把这些积累分享出去
但是根据常规思路搭建一个属于自己的博客网站又太麻烦,这个时候可以使用 Github + Hugo 快速搭建一套属于自己的博客网站,下面就对搭建流程做一个简单的介绍
*注*:以下步骤以在 macOS 上的操作为例,其它操作系统类似,只是一些工具和命令有区别
注册一个 Github 账号
首先你要有一个 Github 账号,这里就不赘述了,毕竟注册 Github 的流程不复杂
创建一个 repo
新建一个 GitHub repository,库名为 username.github.io,username 即你的 GitHub 账号 username
例如我创建的 repo 就叫 war408705279.github.io
安装 Hugo
Hugo 安装的官方文档 传送门
可以使用 Homebrew 进行快速的安装,命令如下
# 安装 hugo
brew install hugo

# 查看 hugo 版本信息
hugo version
新建一个 Hugo 网站
cd 到你想保存 Hugo 网站的目录下,运行下面的命令
cd /code

hugo new site myblog命令运行成功后会在当前目录(/code)下创建一个名为 myblog 的文件夹,里面保存着网站的初始文件。注意这里不用重复创建 myblog 文件夹
选择 Hugo 主题并克隆至本地目录
Hugo 一个比较棒的功能是可以让用户自定义博客主题
官方获取 themes 主题的地址 传送门
目前我使用的主题是 hello-friend-ng 传送门
将所选主题克隆至本地目录,运行下面的命令
# 进入网站目录,这个目录就是之前创建的那个目录
cd /code/myblog

# 在目录下创建 themes 文件夹
mkdir -p themes

# 进入 themes 目录
cd themes

# 将 hello-friend-ng 主题克隆至 hello-friend-ng 文件夹
git clone https://github.com/rhazdon/hugo-theme-hello-friend-ng.git hello-friend-ng
编辑配置文件
现在准备工作就完成了,需要修改配置文件使主题生效,同时也可以通过配置文件自定义 title,目录 等
配置文件为 /code/myblog 目录下的 config.toml 文件
一般情况下,Hugo 主题页面中多会对该主题怎么进行配置予以说明
如果实在不知道怎么去配置,git clone 下来的 themes 代码里面有示例可以进行参考
类似我使用的主题,配置文件的示例就保存在 /code/myblog/themes/hello-friend-ng/exampleSite/config.toml 文件中
下面这段配置是我目前正在使用的配置
baseURL = "https://war408705279.github.io"
title   = "简眸。"

DefaultContentLanguage = "en"

theme = "hello-friend-ng"

pygmentsCodefences = true
pygmentsUseClasses = true
rssLimit  = 10  # Maximum number of items in the RSS feed.
copyright = "This work is licensed under a Creative Commons Attribution-NonCommercial 4.0 International License." # This message is only used by the RSS template.

# googleAnalytics = ""
# disqusShortname = ""

archetypeDir = "archetypes"
contentDir   = "content"
dataDir      = "data"
layoutDir    = "layouts"
publishDir   = "public"

buildDrafts  = false
buildFuture  = false
buildExpored = false
canonifyURLs = true

enableRobotsTXT = true
enableGitInfo   = false
enableEmoji     = true
enableMissingTranslationPlaceholders = false
disableRSS     = false
disableSitemap = false
disable404     = false
disableHugoGeneratorInject = false

[permalinks]
  posts = "/posts/:year/:month/:title/"

[author]
  name = "Zhazha"

[blackfriday]
  hrefTargetBlank = true

[taxonomies]
  tag      = "tags"
  category = ""

[params]
  dateform        = "Jan 2, 2006"
  dateformShort   = "Jan 2"
  dateformNum     = "2006-01-02"
  dateformNumTime = "2006-01-02 15:04 +0800"

  # Metadata mostly used in document's head
  description = "This is a blog belongs to Zhazha"
  keywords = "HTML5, Javascript, css, front-end, blog"
  images = [""]

  homeSubtitle = "人生漫长我劝你好生走路"

  # Prefix of link to the git commit detail page. GitInfo must be enabled.
  # gitUrl = ""

  # Integrate Javascript files or stylesheets by adding the url to the external assets or by
  # linking local files with their path relative to the static folder, e.g. "css/styles.css"
  customCSS = []
  customJS  = []

  # Toggle this option need to rebuild SCSS, requires extended version of Hugo
  justifyContent = false  # Set "text-align: justify" to .content.

  # Directory name of your blog content (default is `content/posts`)
  contentTypeName = "blogs"
  # Default theme "light" or "dark"
  defaultTheme = "dark"

  [params.logo]
    logoText     = "简眸。"
    logoHomeLink = "/"

  # Social icons

  [[params.social]]
    name = "email"
    url  = "mailto:408705279@qq.com"

  [[params.social]]
    name = "github"
    url  = "https://github.com/war408705279/"

[languages]
  [languages.en]
    subtitle  = "人生漫长我劝你好生走路"
    weight    = 1
    copyright = '<a href="https://github.com/war408705279/" target="_blank" rel="noopener">404 Not Found</a>'

[menu]
  [[menu.main]]
    identifier = "blogs"
    name       = "博客"
    url        = "blogs/"
    weight     = 9
  [[menu.main]]
    identifier = "travel"
    name       = "游记"
    url        = "travel/"
    weight     = 10
新建一篇文章
进入网站文件夹的根目录
cd /code/myblog使用以下命令新建一篇文章
hugo new blogs/blog-test.md运行上述命令后,会在 /code/myblog/content 目录下面创建一个 blogs 文件夹
并在该文件夹中创建 blog-test.md 文件
在后续创建文章的过程中,要注意路径和文件命名的问题,避免重复创建、路径错误等问题
编辑新建的文章,添加内容并保存
本地预览网站效果
在本地启动 Hugo server
cd /code/myblog

hugo server -D
可以看到本地服务启在 http://localhost:1313
如果你对编辑的结果满意,就可以准备发布了
如果不满意,可以继续对 config.toml 文件或你创建 md 的文件进行编辑
本地的 hugo server 是热更新的,每次你保存后就会自动更新
构建 Hugo 网站
运行下面的命令在本地构建 Hugo 网站
cd /code/myblog

hugo
本地构建成功后,生成的文件保存在 /code/myblog/public 文件夹中,包含 html、css、js、图片文件等
将网站文件夹转换为 Git 库
下面就是将本地目录和 Git 远程库关联起来
# 生成的 hugo 站点文件保存在 public 目录中,需要将 public 文件夹转换为 Git 库
cd /code/myblog/public

# 初始化 Git 库
git init

# 将本地目录和 Git 远程仓库关联
git remote add origin git@github.com:war408705279/war408705279.github.io.git
将修改推至远程库
关联成功后,会看到本地 Git 库和远程的 Git 仓库有差异,需要将修改推送到远程的 Git 仓库,运行下面的命令
git add .
git commit -m 'commit message'
git push origin master
推送成功后,你的 blog 网站就创建成功了,可以通过下面的链接访问
# 把 war408705279.github.io 这部分换成你的 Git repo 名字就可以了
https://war408705279.github.io
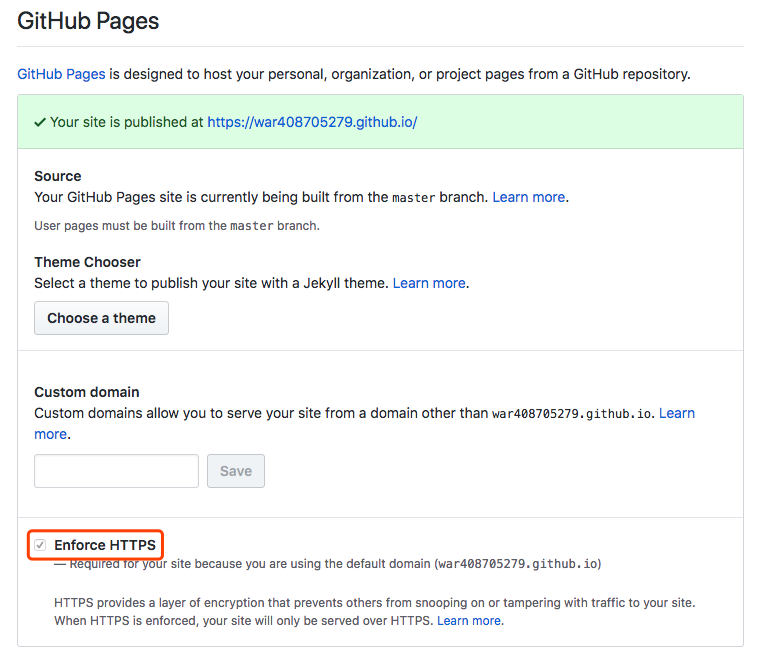
如果想使用 HTTPS 以防止其他人窥探或篡改网站流量,在 GitHub 上打开相应的库,点击 Settings 勾选 Enforce HTTPS 即可,如下图所示

后续
如果你想修改博客文章,或者增加新的博客文章,只需要重复下面几步就可以了
- 新建一篇文章,编辑内容
- 本地预览网站呈现效果
- 构建
Hugo网站 - 提交修改至
Git本地库 - 将修改推至远程库